Who is this for?
- Total beginners who have never touched Unreal before.
- Anyone who, like me, is still figuring things out as they go.
Important: I am not an expert. When I’m unsure, I flag it with ❓ and explain my best guess.
- Why We Use the Altar Project
- Step 1 – Open the Altar Project in UE 5.3.2
- Step 2 – Extract the Skeleton & Animations with FModel
- Step 3 – Import Everything into Blender
- Step 4 (Optional) – Edit in MotionBuilder or Cascadeur
- Step 5 – Bring the Mesh into Unreal without Breakage
- Step 6 – Import Your Animations at 60 FPS
- Step 7 – Mirror the Game’s Folder Structure
- Step 8 – Add Animation Notifies with JsonAsAsset
- Animation Notifies — What & Why
- Example: Replacing the First Shortsword Light Attack
- Why You Must Recreate the Blueprint
- How to Recreate BP_ActionNotifyState_ChainingWindow
- TL;DR
- Step 9 – Final Tweaks & Packaging
- Common Pitfalls
- Useful Links
Why We Use the Altar Project
Oblivion Remastered was built with a custom branch of Unreal. Altar is a public demo project on GitHub that matches that branch. By loading our new animations into Altar first, we can package them so the game will actually read them. Think of Altar as a sandbox that speaks the same language as the final game.
Step 1 – Open the Altar Project in UE 5.3.2
- Download the project: https://github.com/Kein/Altar
- Use exactly UE 5.3.2. Newer versions may break things.
- If Unreal refuses to open the project because it “can’t build C++ files,” the problem is often Visual Studio:
- UE tries to compile with every compiler it finds.
- If you have only VS 2022 installed, UE sometimes chokes.
- Quick fix: Temporarily rename or delete the
MSVC\14.*folder for the newer toolset. UE will then fall back to the older one and the project opens.
Analogy: UE is picky like a restaurant that only accepts one brand of credit card. Hide the others and it’s happy.
Step 2 – Extract the Skeleton & Animations with FModel
We need the game’s Humanoid skeleton and the vanilla animations so we can edit them.
- Grab the latest FModel release (older ones miss some assets).
- Open the archive
OblivionRemastered‑Windows.utocand navigate to:OblivionRemastered/Content/Art/Character/Humanoid/ - Right‑click
SK_HumanoidFull→ Export → .psk (this is the mesh + bones). - Export any animation you plan to replace as .psa. Example sprint:
.../Animation/Humanoid/ThirdPerson/Passive/Locomotion/Normal/A_Humanoid_Passive_Sprint.uasset
Two FModel Versions? ❓
JsonAsAsset (Step 8) sometimes requires a different FModel build to fetch notify data. Check their Discord for the recommended version.
About .usmap Files
Both FModel and JsonAsAsset will ask for usmap files. You can dump them with UE4SS. If that sounds annoying, I shared my own dump here (no guarantee it still works):
Step 3 – Import Everything into Blender
- Install the PSA/PSK Importer: https://extensions.blender.org/add-ons/io-scene-psk-psa/
- Import
SK_HumanoidFull.psk. In the Outliner, rename the top node toArmature.- Why? Unreal treats the top node name as root. Calling it
Armaturetricks UE into using a cleanroothierarchy.
- Why? Unreal treats the top node name as root. Calling it
- Immediately export to FBX with scale
0.01(Blender is giant by default). - To bring in vanilla animations:
- Select the
Armature. - File → Import → PSA and choose the file from Step 2.
- Select the
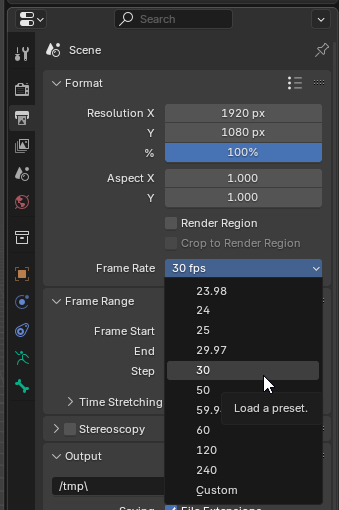
FPS Minefield ★
Set Blender’s scene FPS to 30 before importing the PSA. The developers animated at 30 FPS but imported to UE at 60 FPS (custom sample rate). If you forget this, the total length doubles, and notifies will fire at the wrong time.
Rule of Thumb: Always ask, “What FPS was the source made at?” before touching anything.
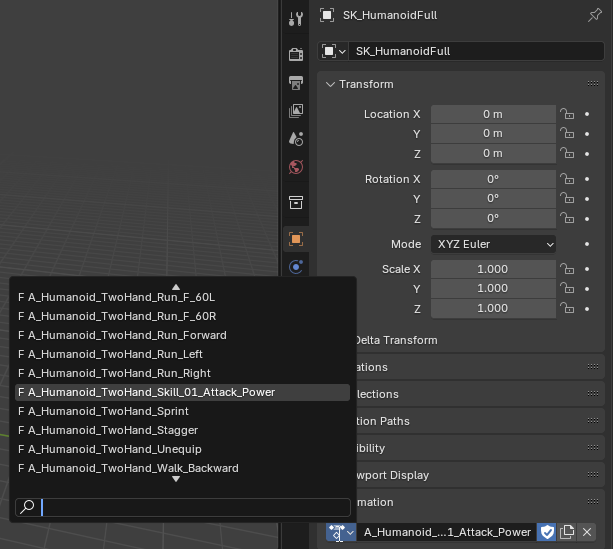
Blender ‘Action’ Tracks
After import, you might see nothing change. Switch the Action dropdown—each animation lives there, similar to MotionBuilder Takes.
Step 4 (Optional) – Edit in MotionBuilder or Cascadeur
I animate in MotionBuilder because I’m old‑school, but it’s pricey. Cascadeur is a cheaper modern alternative. I’ll upload the rig to Nexus soon so everyone can use it.
Step 5 – Bring the Mesh into Unreal without Breakage
- In Altar, recreate the folder path you saw in FModel. Example:
Content/Art/Character/Humanoid/ Import your FBX there.Unreal auto‑creates a new Skeleton asset. Rename it (e.g.,SK_HumanoidFull_fake) so it never overwrites the game’s real one. We only need it so the animations have something to reference while cooking.
⚠️ Correction 2025/07/31:
What I wrote earlier was totally wrong.
You shouldn’t let Unreal auto-create a new Skeleton by importing SK_HumanoidFull.fbx.
Instead, just use JsonAsAsset to import the SKEL_HumanoidSkeleton.json file.
Once it’s imported, rename the skeleton asset to something like SKEL_HumanoidSkeleton_fake, so you don’t accidentally overwrite the real one.
We only need this dummy skeleton so the animations have something to reference during cooking.
Step 6 – Import Your Animations at 60 FPS
- Right‑click in the same folder → Import → select your FBX animation.
- Choose the fake skeleton.
- In the import options, set Sample Rate = 60.
- Double‑check that the timeline length matches the original (seconds and frames).
Step 7 – Mirror the Game’s Folder Structure
If the game’s file lives at
.../Passive/Locomotion/Normal/
your replacement must follow the exact same path inside the .pak. If not, the engine ignores it.
Step 8 – Add Animation Notifies with JsonAsAsset
Install the JsonAsAsset plugin in Altar.Dump the notify data from the original animation as.jsonvia FModel.Create an empty Blueprint with the same name and parent class shown inside the.json. Place it in the matching folder. ❓ Why is this needed? JsonAsAsset copies tags from the Blueprint when pasting notifies. No BP, no notifies.Right‑click your new Anim Sequence → Scripts → Attach Notifies from JSON.
⚠️ Correction (2025/07/31)
This part was a mess — not enough explanation of what you’re doing or why you’re doing it. Here’s the fixed version.
Animation Notifies — What & Why
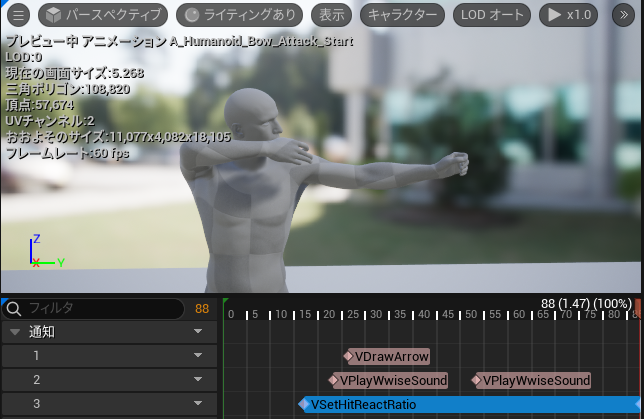
What: Animation notifies are events embedded in an animation timeline (e.g., “play a footstep sound here,” “turn on hit detection now”).
Why: If you import an animation without the right notifies, the game won’t trigger systems tied to that motion. Result: silent footsteps, no damage during swings, etc.
There are two kinds of notifies:
- Single-shot Notify: Fires once at a specific frame (e.g., a footstep).
- Notify State: Has a start and end (e.g., a hitbox that stays active for a few frames).
Example: Replacing the First Shortsword Light Attack
Target vanilla asset path:
OblivionRemastered/Content/Art/Animation/Humanoid/ThirdPerson/OneHand/Combat/Attacks/Shortsword/A_Humanoid_Shortsword_Attack_A_v0
Step 1 — Inspect the notifies used by vanilla
- Use FModel to dump:
A_Humanoid_Shortsword_Attack_A_v0.json - This .json shows which notifies are required and what Blueprint class/tag data they expect.
Step 2 — Import your animation and attach notifies
- Drag-and-drop your custom animation into the UE Content Browser.
- Name it:
A_Humanoid_Shortsword_Attack_A_v0 - With the asset selected, use JsonAsAsset → Attach Notifies from JSON and select the dumped .json.
If everything is prepared correctly, JsonAsAsset will add the right notifies automatically.
Heads up: JsonAsAsset copies tag data from the Blueprint class referenced by the .json.
If that Blueprint doesn’t exist in your project, the notify import can’t fully apply.
Why You Must Recreate the Blueprint
- You can dump Blueprint info with FModel, but JsonAsAsset cannot import Blueprint .json.
- So you must manually recreate the Blueprint class that the notify expects.
Example case: The notify needs a Blueprint named:
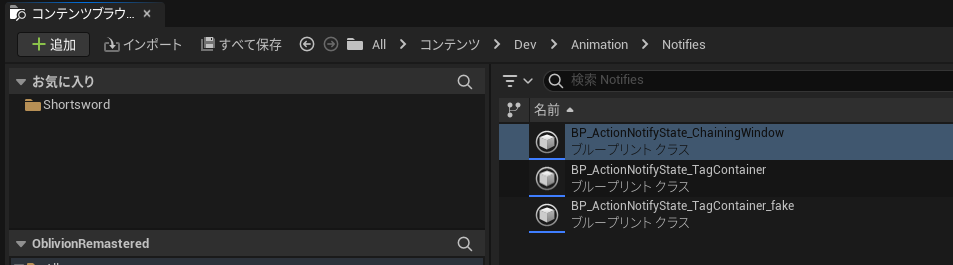
BP_ActionNotifyState_ChainingWindowThis Blueprint defines the window where the game listens for the next attack input (combo chaining).
How to Recreate BP_ActionNotifyState_ChainingWindow
Folder path (recommended):
Content/Dev/Animation/NotifiesCreate the Blueprint:
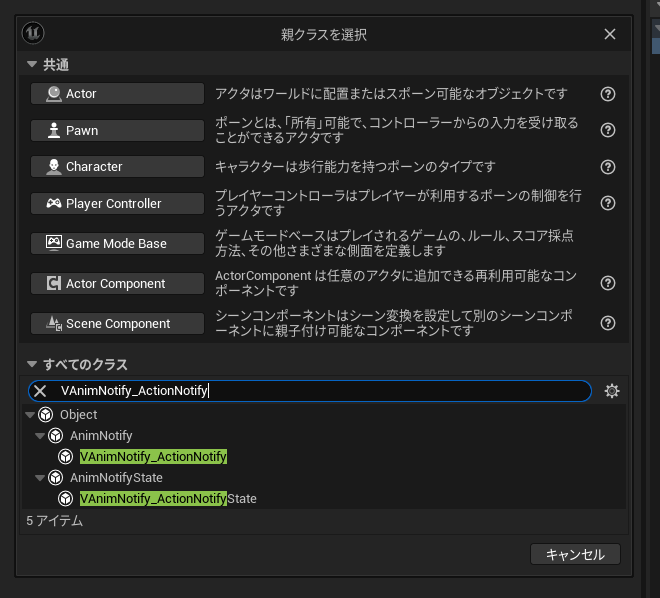
- Right-click in the Content Browser → Blueprint Class.
- When the class picker appears, set the parent class to:
VAnimNotify_ActionNotifyStateWhy? The .json says:"ObjectName": "Class'VAnimNotify_ActionNotifyState'"
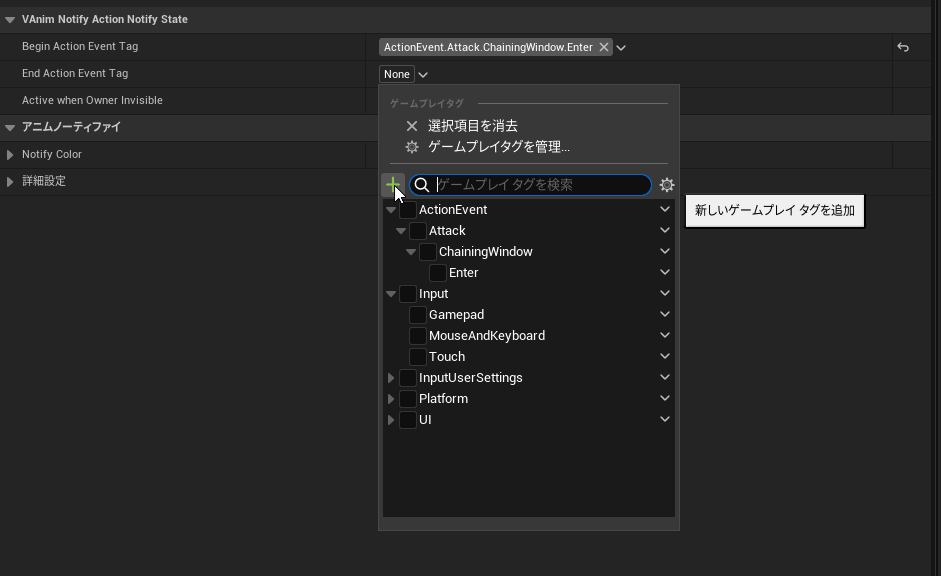
Add Gameplay Tags:
- Open the new Blueprint and go to the Details panel.
- Find Tags. If it shows None, click it and press the green + to add tags.
- Add the tags listed in the .json. For this example:
ActionEvent.Attack.ChainingWindow.EnterActionEvent.Attack.ChainingWindow.Exit
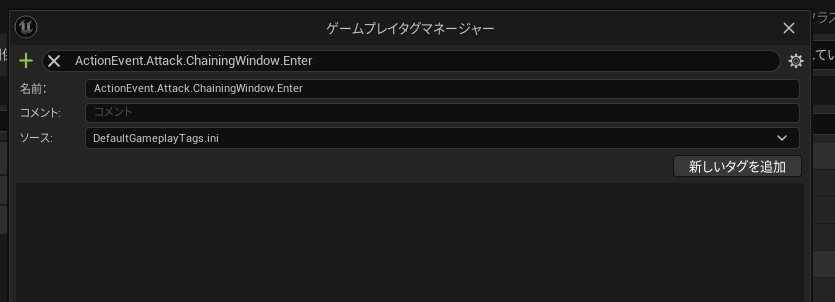
- Set Source to
DefaultGameplayTags.ini(that’s fine).
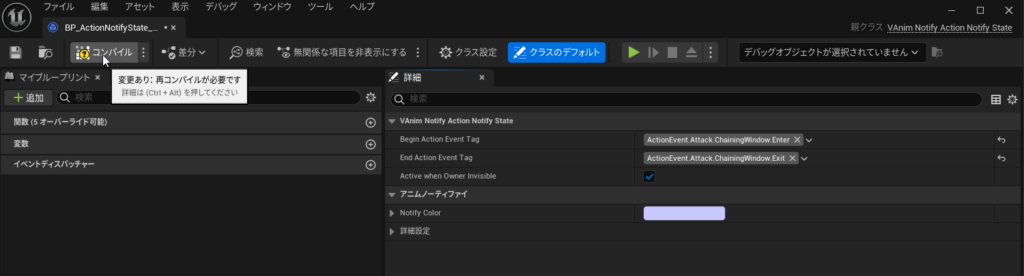
Compile & Save. Done.
Note: Not every notify needs its own Blueprint. This is just a clean example where it matters.
TL;DR
- If you’re replacing a vanilla animation, dump its .json with FModel and see which notifies it uses.
- Recreate the Blueprint class those notifies depend on (parent class + gameplay tags) because JsonAsAsset can’t import Blueprint .json.
- Import your animation, name it to match the vanilla asset, then use JsonAsAsset → Attach Notifies from JSON.
- With the Blueprint in place, JsonAsAsset will auto-apply the correct notifies.
Analogy: Think of JsonAsAsset as a stamp factory. The Blueprint is the rubber sheet with the pattern. Without it, the stamp machine has nothing to copy.
⚠️Troubleshooting: JsonAsAsset Doesn’t Apply Notify States (2025/07/31) Sometimes, even if you’ve created the correct Blueprint, JsonAsAsset still fails to import the animation state notifies from the .json.
In my case, it worked after I clicked on the Blueprint in the Content Browser, opened it once, then closed it again.
After doing that, importing the .json suddenly worked.No idea why — maybe opening the BP forces it to fully load in memory or something.
Just a guess, but it seems to help.
Step 9 – Final Tweaks & Packaging
- Open the Anim Sequence, slide notifies if the timing feels off.
- Unreal 5.3 removed Chunk Assignments. Now we use Primary Asset Labels:
- Right‑click → Misc →Data Asset →Primary Asset Label.
- Add your assets.
- Pick a Chunk ID (any unused number).
- Set the Cook Rule to Always Cook
- Tick Is Runtime Label
- Cook the project. Your
.pakends with_P.pak. - Drop the file into the game’s
~modsfolder. Launch the game and swing that sword!
⚠️ Heads-up!:You might see this error during packaging:
“The Collision Profile settings are missing an entry for the Water Body collision profile, which is required for water collisions to work. Would you like to add it to DefaultEngine.ini?”
If that happens, just restart the editor. That fixed it for me.
Common Pitfalls
| Problem | Likely Cause | Quick Fix |
|---|---|---|
| Project won’t open | VS 2022 toolset conflict | Hide newer MSVC folder |
| Animation plays at double length | Imported PSA at wrong FPS | Set Blender scene to 30 FPS first |
| Notifies missing | No Blueprint with matching name | Create empty BP before JsonAsAsset |
| Mod doesn’t load | Wrong folder path inside .pak | Mirror original path exactly |
Useful Links
- Altar Project: https://github.com/Kein/Altar
- PSA/PSK Blender Add‑on: https://extensions.blender.org/add-ons/io-scene-psk-psa/
- JsonAsAsset Discord: https://discord.gg/xXEw4jc2UT
- UE4SS: https://github.com/UE4SS/UE4SS
- My example .usmap dump:
Final Words
If anything here is unclear—or flat‑out wrong—please shout at me in the comments. I’m learning too, and I’ll keep polishing this guide. Happy modding!

コメント